Please help to click 1!

Saturday, 15 April 2023

Pfsense vs Open Sense


Functionality/FeaturespfSenseOPNsense
FirewallYes, with stateful packet inspection and zone-based firewallingYes, with stateful packet inspection, aliasing, and virtual IPs
RoutingYes, with dynamic routing protocols (OSPF, BGP, RIP)Yes, with dynamic routing protocols (OSPF, BGP, RIP)
VPNYes, with IPsec, OpenVPN, L2TP, PPTP, and GRE supportYes, with IPsec, OpenVPN, WireGuard, L2TP, and PPTP support
NATYes, with Port Forwarding, 1:1 NAT, and Outbound NATYes, with Port Forwarding, 1:1 NAT, and Outbound NAT
Intrusion Detection/PreventionYes, with Snort and Suricata integrationYes, with Suricata integration
Load BalancingYes, with support for multiple algorithms (round-robin, least connections, etc.)Yes, with support for multiple algorithms (round-robin, least connections, etc.)
DNS/DHCP ServerYes, with DNS Forwarder/Resolver and DHCP Server/RelayYes, with DNS Forwarder/Resolver and DHCP Server/Relay
Web FilteringYes, with Squid Proxy integrationYes, with Squid Proxy integration
High AvailabilityYes, with CARP (requires paid version)Yes, with CARP
Traffic ShapingYes, with support for multiple queuing disciplines (HFSC, CBQ, etc.) (requires paid version)Yes, with support for multiple queuing disciplines (HFSC, CBQ, etc.)
Captive PortalYes, with support for RADIUS authentication (requires paid version)Yes, with support for RADIUS authentication

Saturday, 1 April 2023

VMware Cloud Director Availability Replication vs Veeam Replication


Here is a summary of some key features and differences between the two technologies based on:

FeatureVMware Cloud Director Availability ReplicationVeeam Replication
Target siteOrganization VDC in VMware Cloud Director infrastructureAny VMware vSphere host or cluster
Target site setupMust be configured beforehand by the providerCan be configured on demand by the tenant
Replication typeSnapshot-based replication onlySnapshot-based replication or CDP replication
Backup proxy typeVMware backup proxy onlyVMware backup proxy or VMware CDP proxy
Self-service portalNo self-service portal for tenantsSelf-service portal for tenants to manage replicas and failover plans

Wednesday, 15 March 2023

Comparison between MySQL and PostgreSQL


FeatureMySQLPostgreSQL
LicenseOpen Source (GPL) and CommercialOpen Source (PostgreSQL License)
ACID ComplianceYes (InnoDB storage engine)Yes
ScalabilityLimitedHorizontally Scalable
TransactionsSupports Atomic, Consistent, Isolated, Durable (ACID) transactionsSupports Atomic, Consistent, Isolated, Durable (ACID) transactions
JSON SupportLimited JSON data type supportGood JSON support with JSONB data type and related functions
Stored ProceduresSupports Stored Procedures and TriggersSupports Stored Procedures, Triggers and User-Defined Functions
Table JoinsSupports Inner, Outer, and Cross JoinsSupports Inner, Outer, Cross, and Natural Joins
ConcurrencyRow-level lockingRow-level and Advanced Multi-Version Concurrency Control (MVCC)
SecurityEncryption available at an additional costBuilt-in data-at-rest and data-in-transit encryption options
Object-Relational Mapping (ORM)Fewer 3rd party ORM optionsMore 3rd party ORM options available

Wednesday, 1 March 2023

How to Update vCenter 6.7 to 7.0 step by step


With VCSA you can upgrade vCenter in simplified steps. This article will show you the detailed steps of how to upgrade vCenter 6.7 to 7.0.

vCenter upgrade with the vSphere suite

As you may know, VMware ESXi and vCenter Server are 2 key components of VMware vSphere suite. While ESXi is the type-1 hypervisor on which you can create and run virtual machines and virtual appliances, vCenter Server is a service that acts as a central administrator for ESXi hosts connected in a network.

VMware ESXi and vCenter Server are upgraded with vSphere. As vSphere has upgraded to 7 (and 8 in August 2022), vCenter has upgraded to 7 as well. In order to experience timely feature updates and technical support, you may want your vCenter upgrade with the vSphere suite. This article will show you the detailed steps of how to update vCenter 6.7 to 7.0 via vCenter Server Appliance (VCSA).
vCenter Server Appliance

How to upgrade vCenter 6.7 to 7.0 via VCSA

vCenter Server Appliance (VCSA) is a preconfigured virtual machine that is optimized for running vCenter Server and the associated services. It includes Photon OS, the vSphere authentication services, PostgreSQL, VMware vCenter Lifecycle Manager and Extension.

The presence of VCSA greatly simplifies the process to install vCenter, upgrade vCenter, migrate and restore vCenter. In this part, I will show you the detailed steps of vCenter upgrade via VCSA.

▶ Steps to upgrade vCenter 6.7 to 7.0

1. Download VMware vCenter Server Appliance 7.0 ISO image from the official site, and then mount the ISO image as a virtual DVD drive.

2. Navigate to vcsa-ui-installer\win32 directory and find installer.exe, right-click on installer.exe and select Run as administrator.

Note: If you are using Linux, navigate to vcsa-ui-installer\lin64 and run installer.exe.
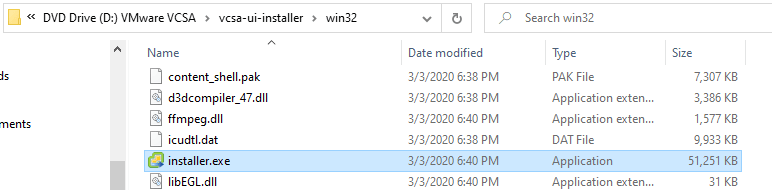
vCenter Server Appliance Installer

3. On the interface of vCenter Server Installer application, click Upgrade.
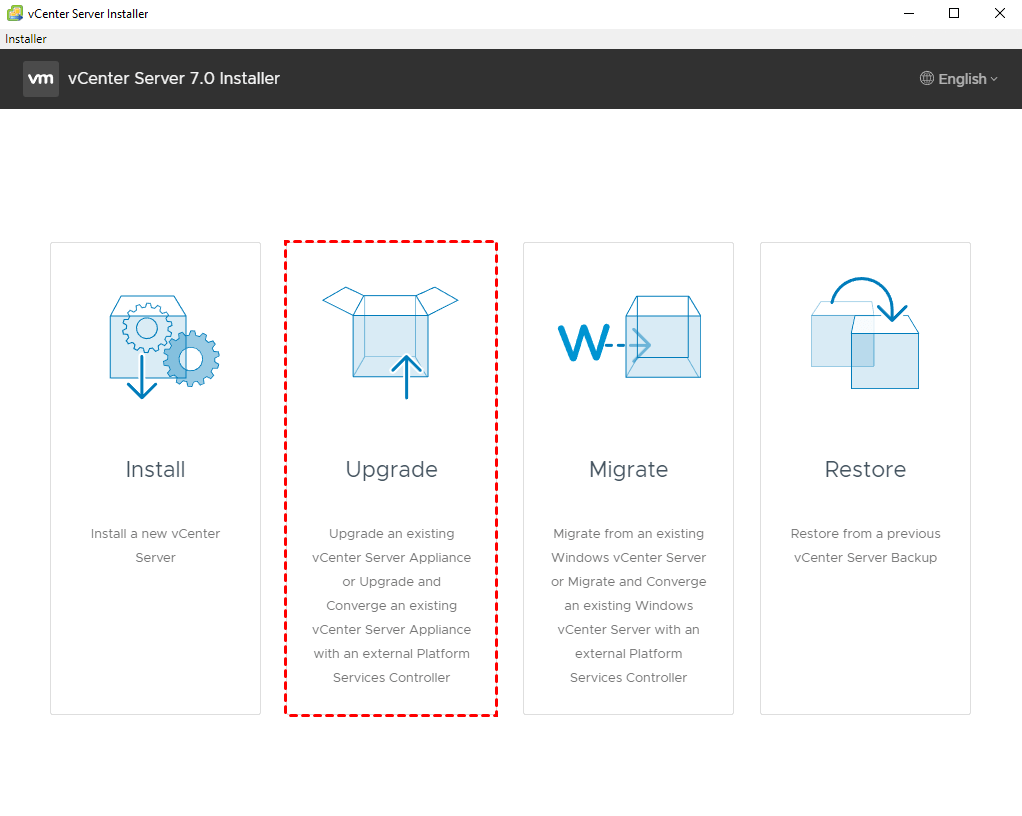
Upgrade vCenter

4. Follow the wizard of Stage 1 Deploy vCenter Server.
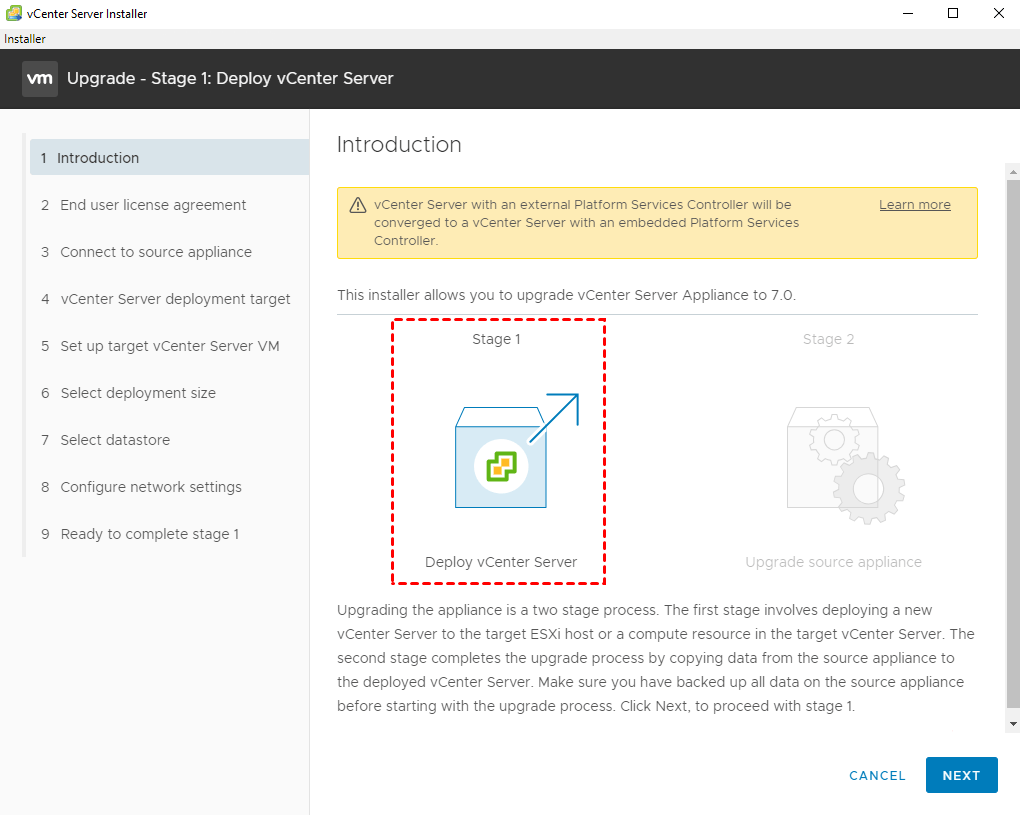
Stage 1 Deploy vCenter Server

5. Select I accept the terms of the license agreement option, and click Next to continue.
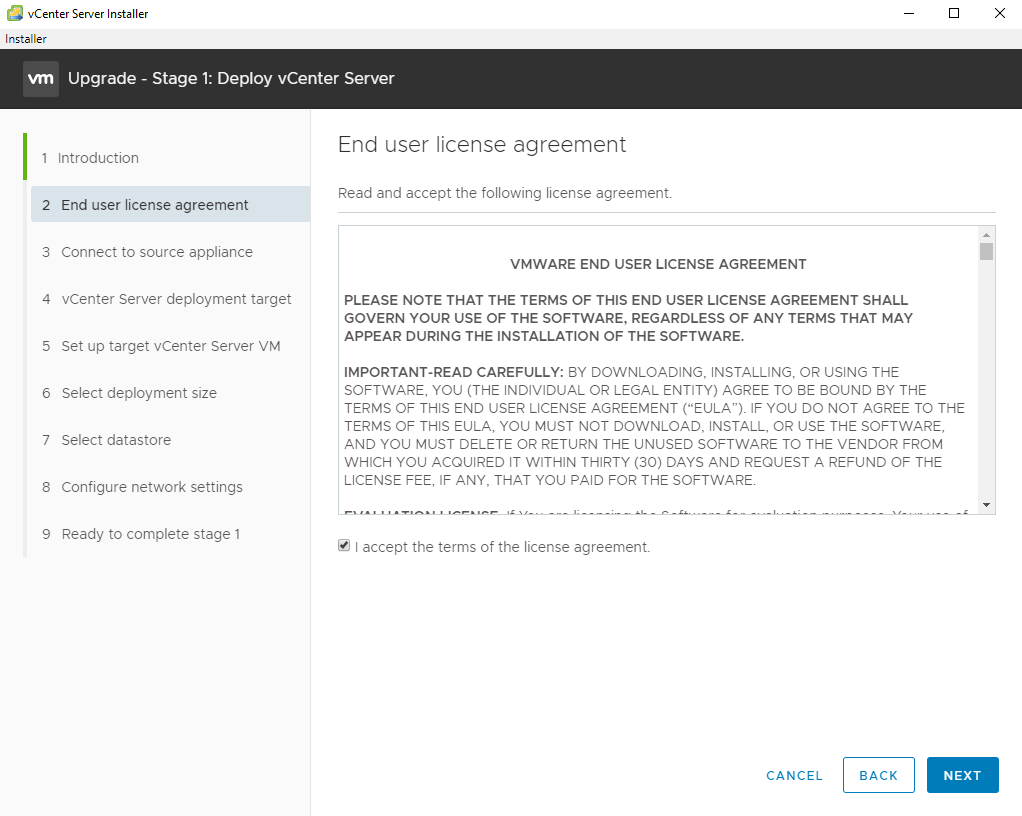
I accept the terms of the license agreement

6. Provide the details for the source vCenter Server Appliance that you want to upgrade. Enter the existing VCSA FQDN or IP address and all of the login credentials for the existing VCSA and ESXi host.
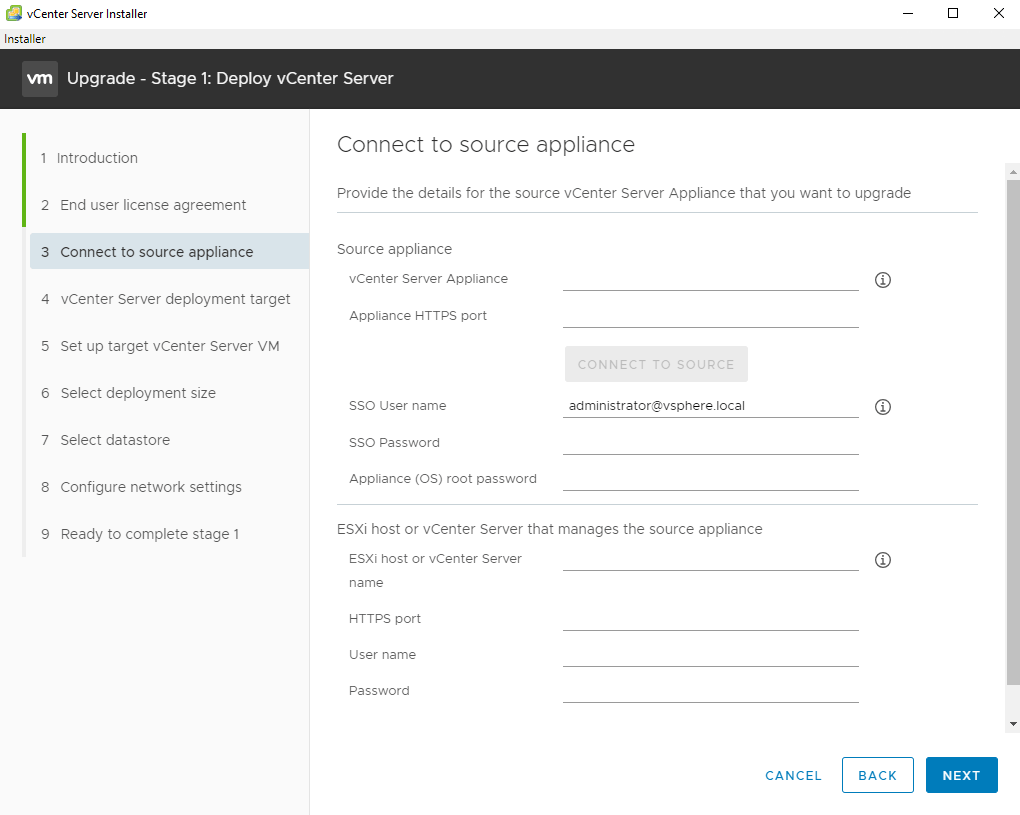
Connect to source appliance

7. Specify the vCenter Server deployment target settings. The target is the ESXi host or vCenter Server instance on which the new vCenter Server Appliance 7.0 will be deployed.
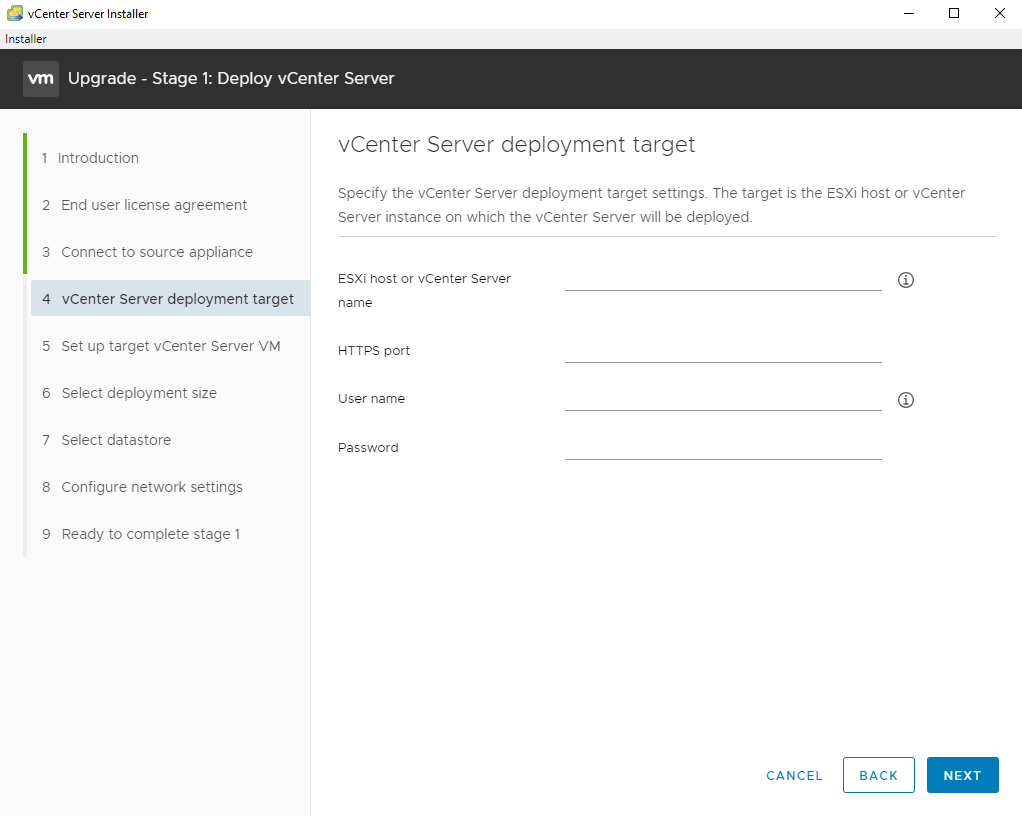
vCenter Server deployment target

8. Specify the VM name and root password for the new vCenter Server 7.0 to be deployed.
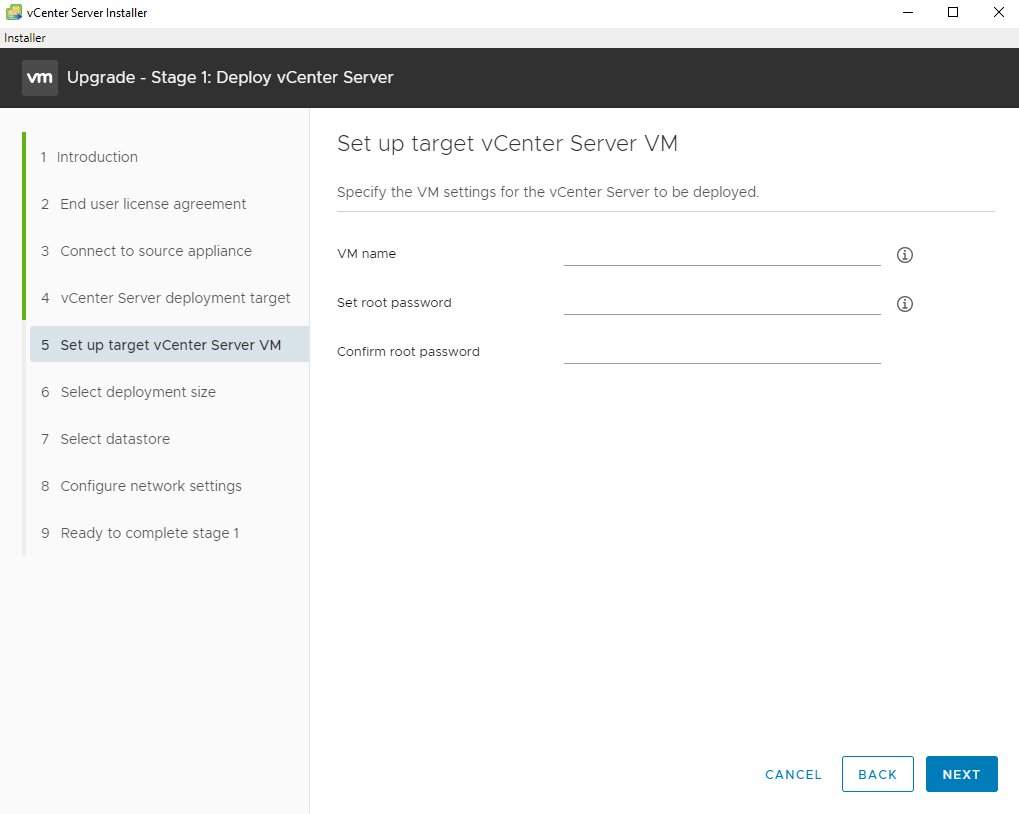
Set up target vCenter Server VM

9. Select the deployment size for this vCenter Server. You can refer to the official chart of resources required for different deployment sizes.
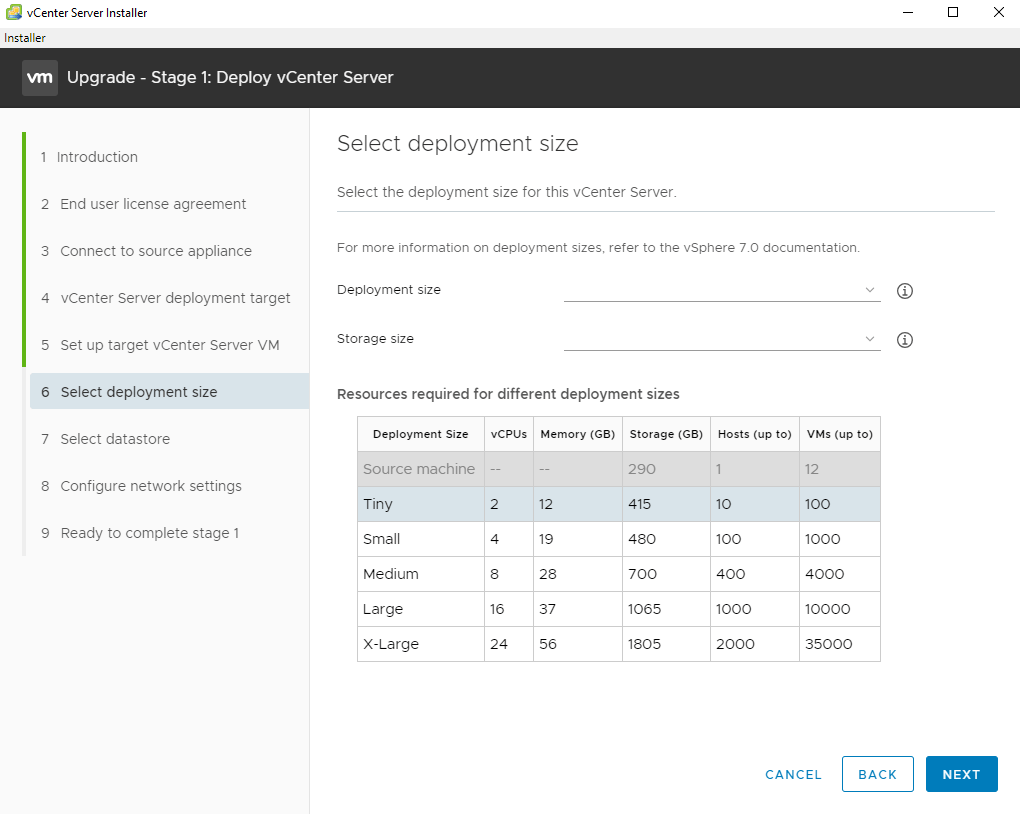
Select deployment size

10. Select the storage datastore for this vCenter Server. You can choose to show only compatible datastores.

Select datastore

11. Configure network settings for this vCenter Server.
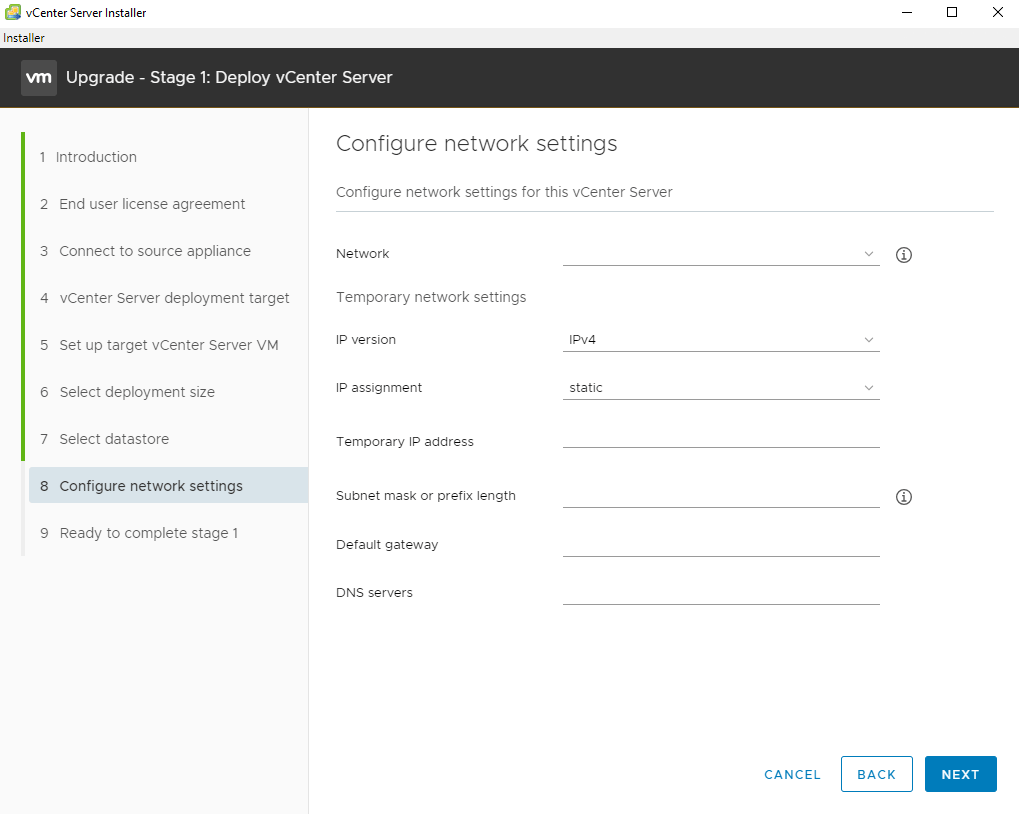
Configure network settings

12. Review the settings and click Finish to initialize stage 1 deployment. When it completes, click Next to continue Stage 2 Upgrade source vCenter Server.
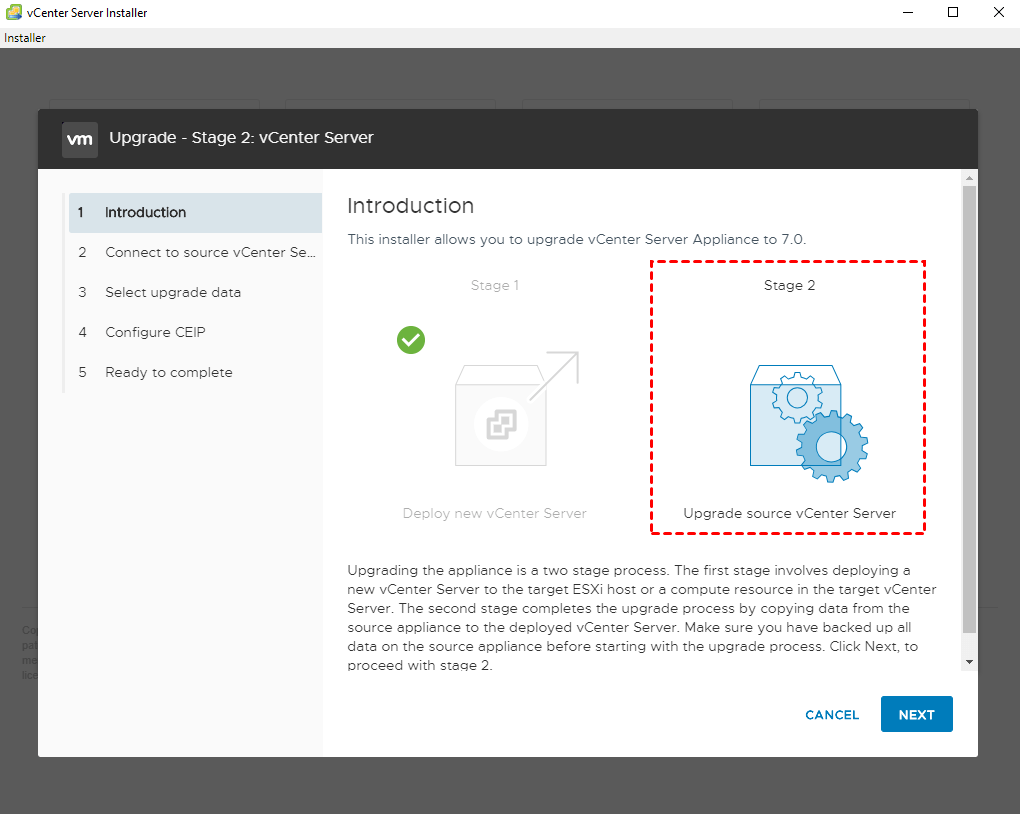
Stage 2 Upgrade source vCenter Server

13. The installer will automatically run a Pre-Upgrade check on your existing VCSA. Check the results and then click on Next to continue.

Note: Be sure that DRS is disabled if you have more than one host.
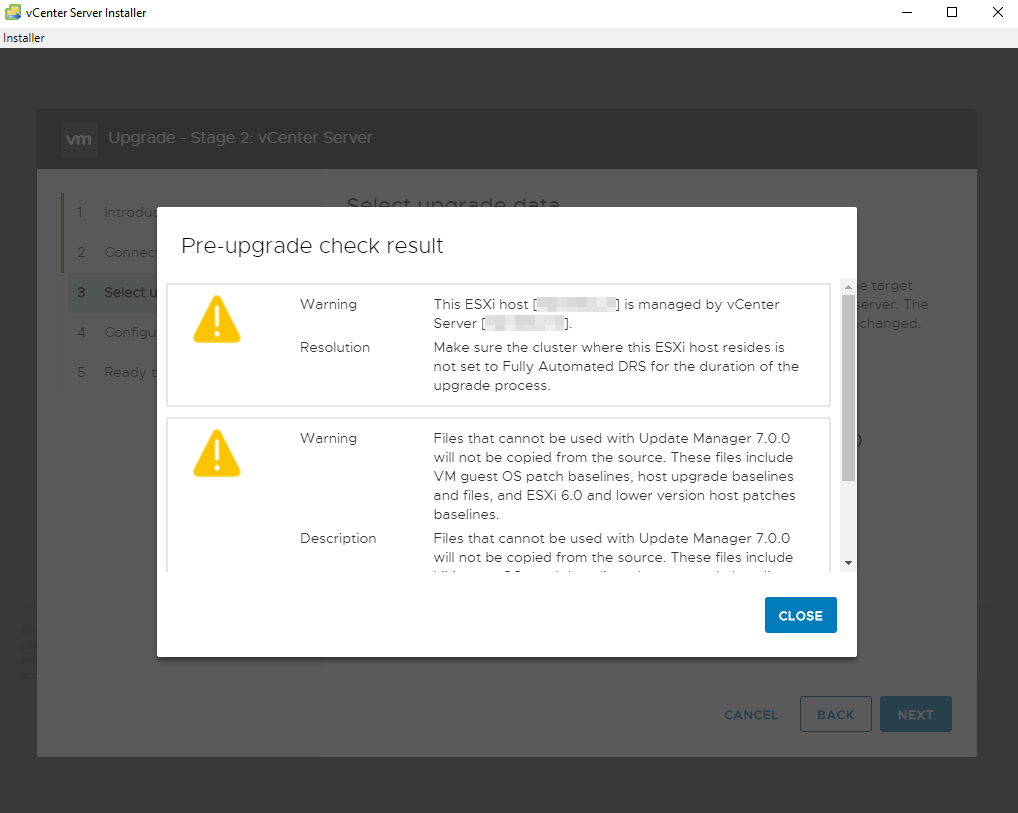
Pre-upgrade check

14. Select the data that you want to copy from the source vCenter Server.
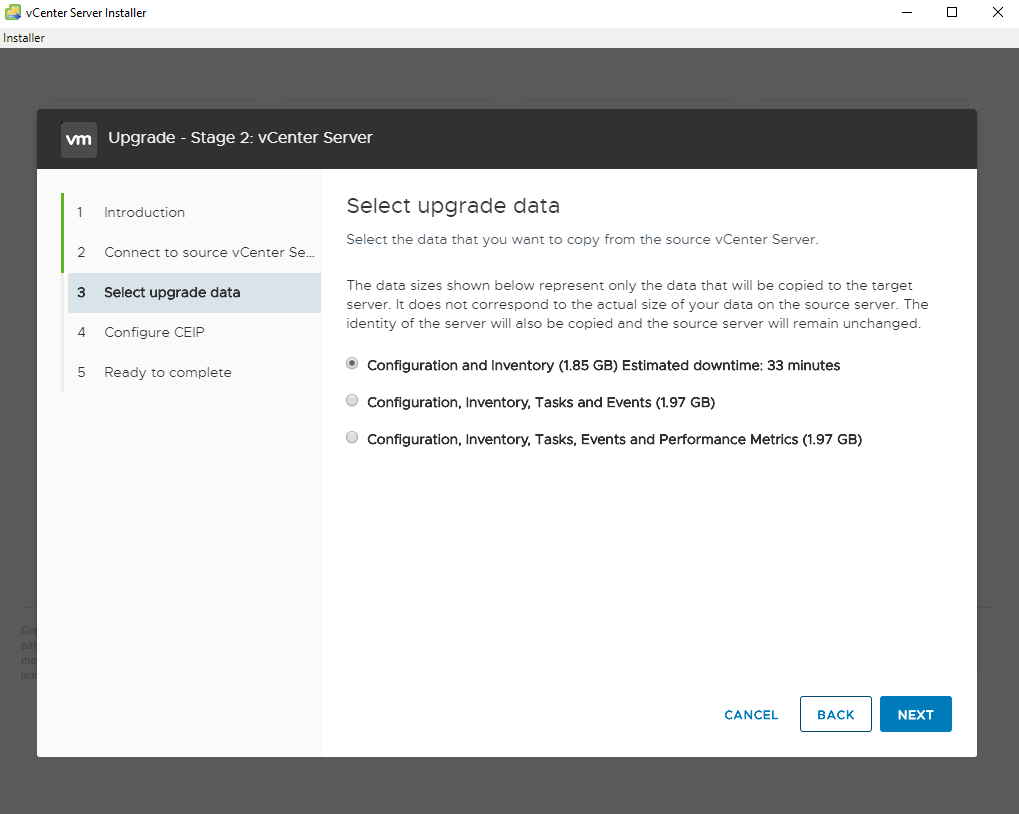
Select upgrade data

15. Check the Join the VMware’s Customer Experience Improvement Program (CEIP) option and click Next to review the settings. Then you can click Finish to initialize the Upgrade.
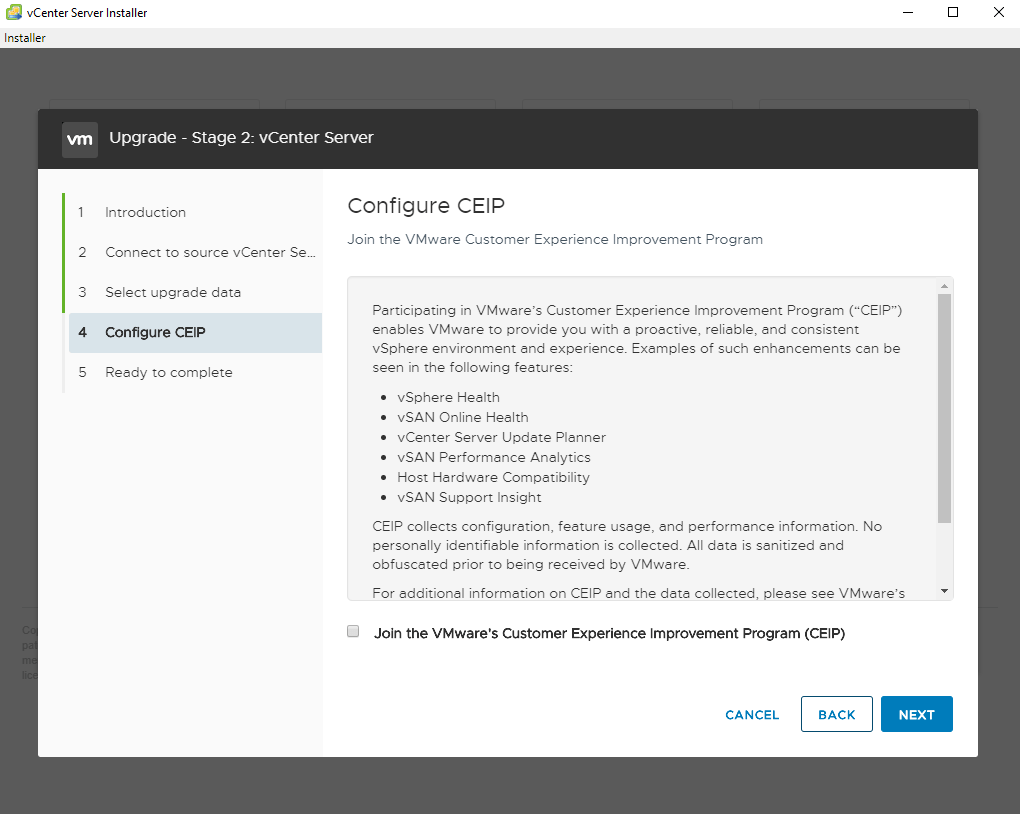
Configure CEIP

Backup VMware ESXi VMs to protect the VM data

vCenter Server is a very convenient official platform for centrally managing ESXi virtual environments and large numbers of VMs on it. However, it does not provide the feature of virtual machine backup. And that makes backup software a commonly accepted choice.

Here I introduce you to a VMware backup software AOMEI Cyber Backup, it enables you to backup multiple VMs in 3 simple steps. And it offers you the following benefits.

✦ Agentless Backup: create complete and independent image-level backup for VMware ESXi and Hyper-V VMs.
✦ Flexible vSphere Backup: batch backup large numbers of VMs managed by vCenter Server, or multiple VMs on a standalone ESXi host.
✦ Multiple Storage Destinations: backup to local drive, or network destinations like Windows share or NAS.
✦ Automated Execution: create backup schedules to automate backups daily, weekly, monthly.

Next, I will show you how to backup multiple VMware ESXi VMs via AOMEI Cyber Backup. You can click the following button to download the 30-day free trial.

Download Free TrialVMware ESXi & Hyper-V
Secure Download

3 steps to perform VMware ESXi VM backup

1. Bind Devices: Access to AOMEI Cyber Backup web client, navigate to Source Device > VMware > + Add VMware Device to Add vCenter or Standalone ESXi host. And then click … > Bind Device.
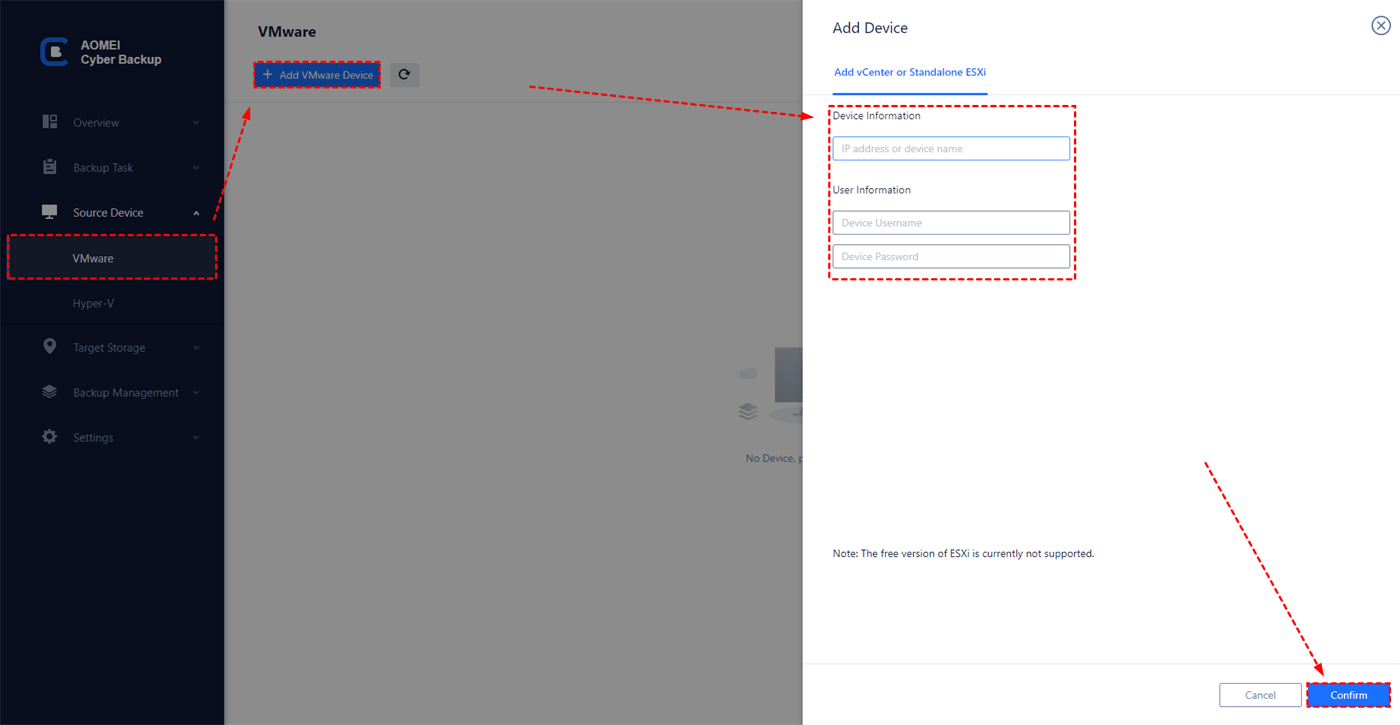
Add VMware ESXi host

2. Create Backup Task: Navigate to Backup Task > + Create New Task, and then set Task Name, Backup Type, Device, Target, Schedule, and Cleanup.

  • Device: batch select large numbers of VMs (10 on free edition) managed by vCenter Server for centralized backup.
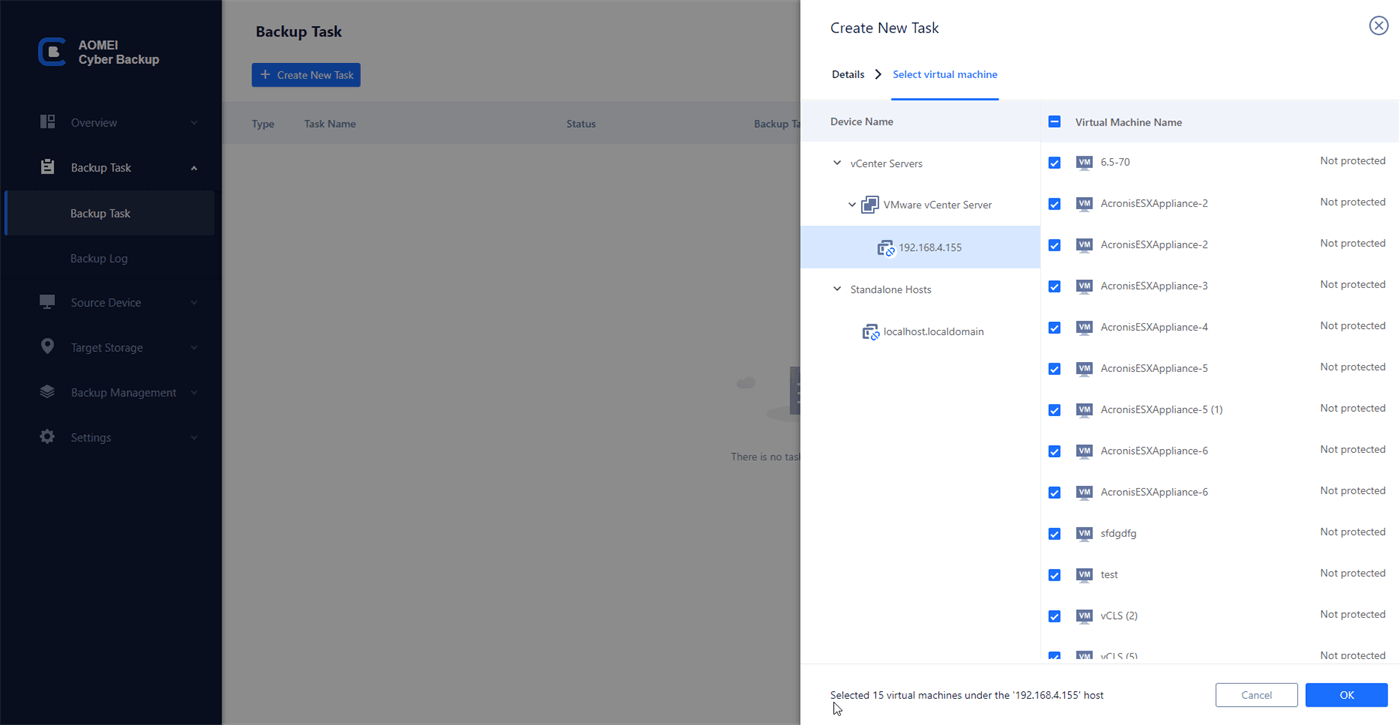
Select virtual machines vCenter

  • Target: select to back up to a local path, or to a network path.
  • Schedule (optional): perform full, differential, or incremental backup, and automate execution according to the frequency you specified.
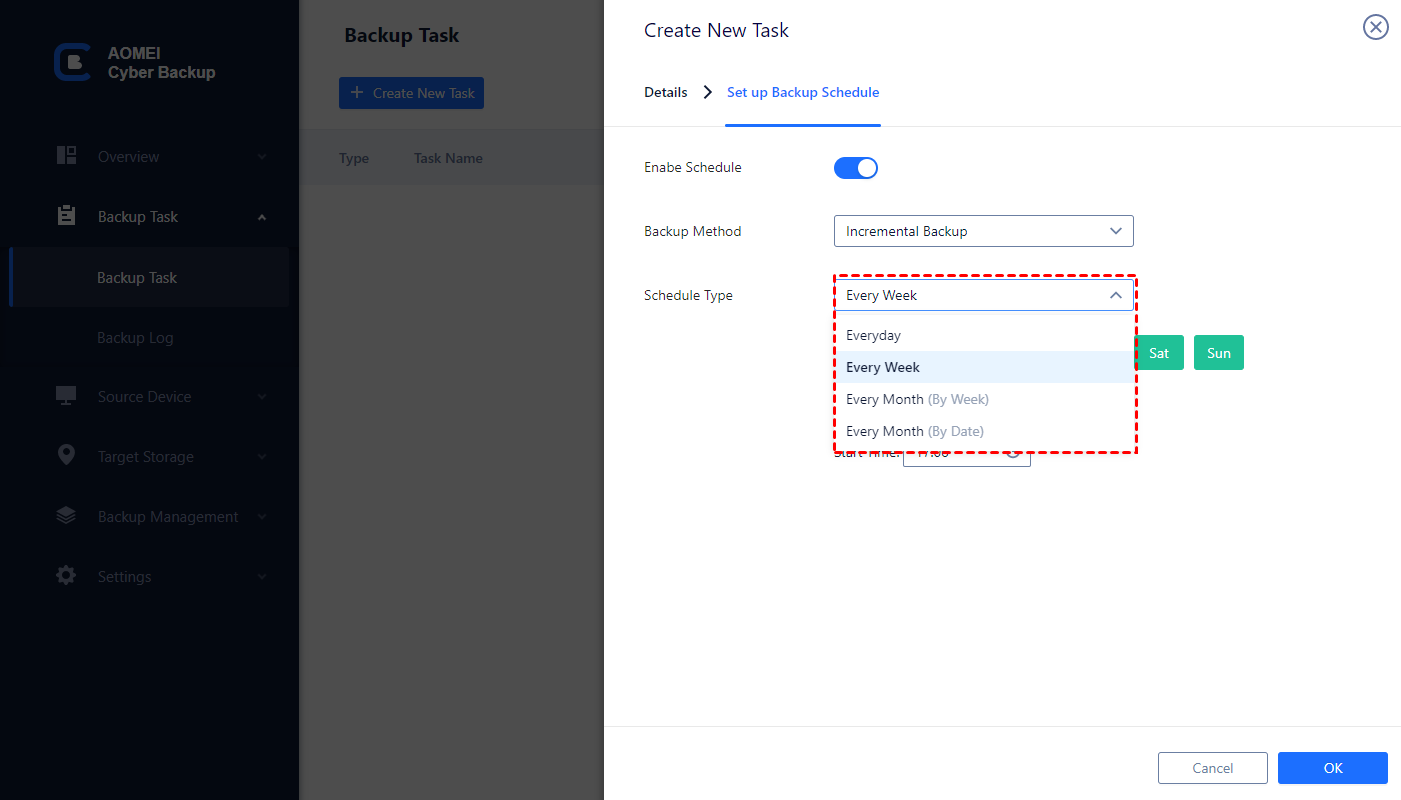
Backup schedule type

  • Cleanup (optional): automatically delete the old backup copies that exceed the retention period you specified.
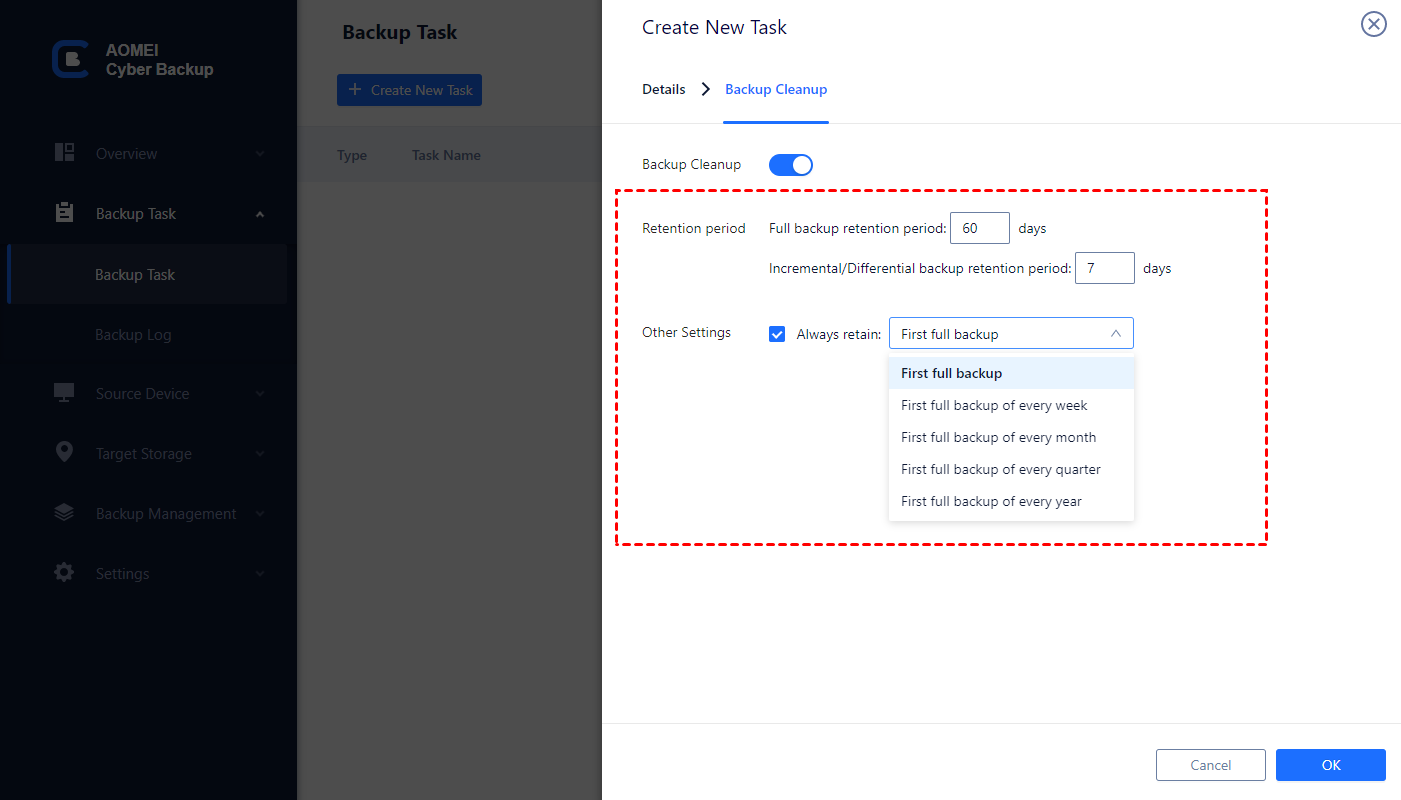
backup cleanup

3. Run Backup: Click Start Backup and select Add the schedule and start backup now, or Add the schedule only.
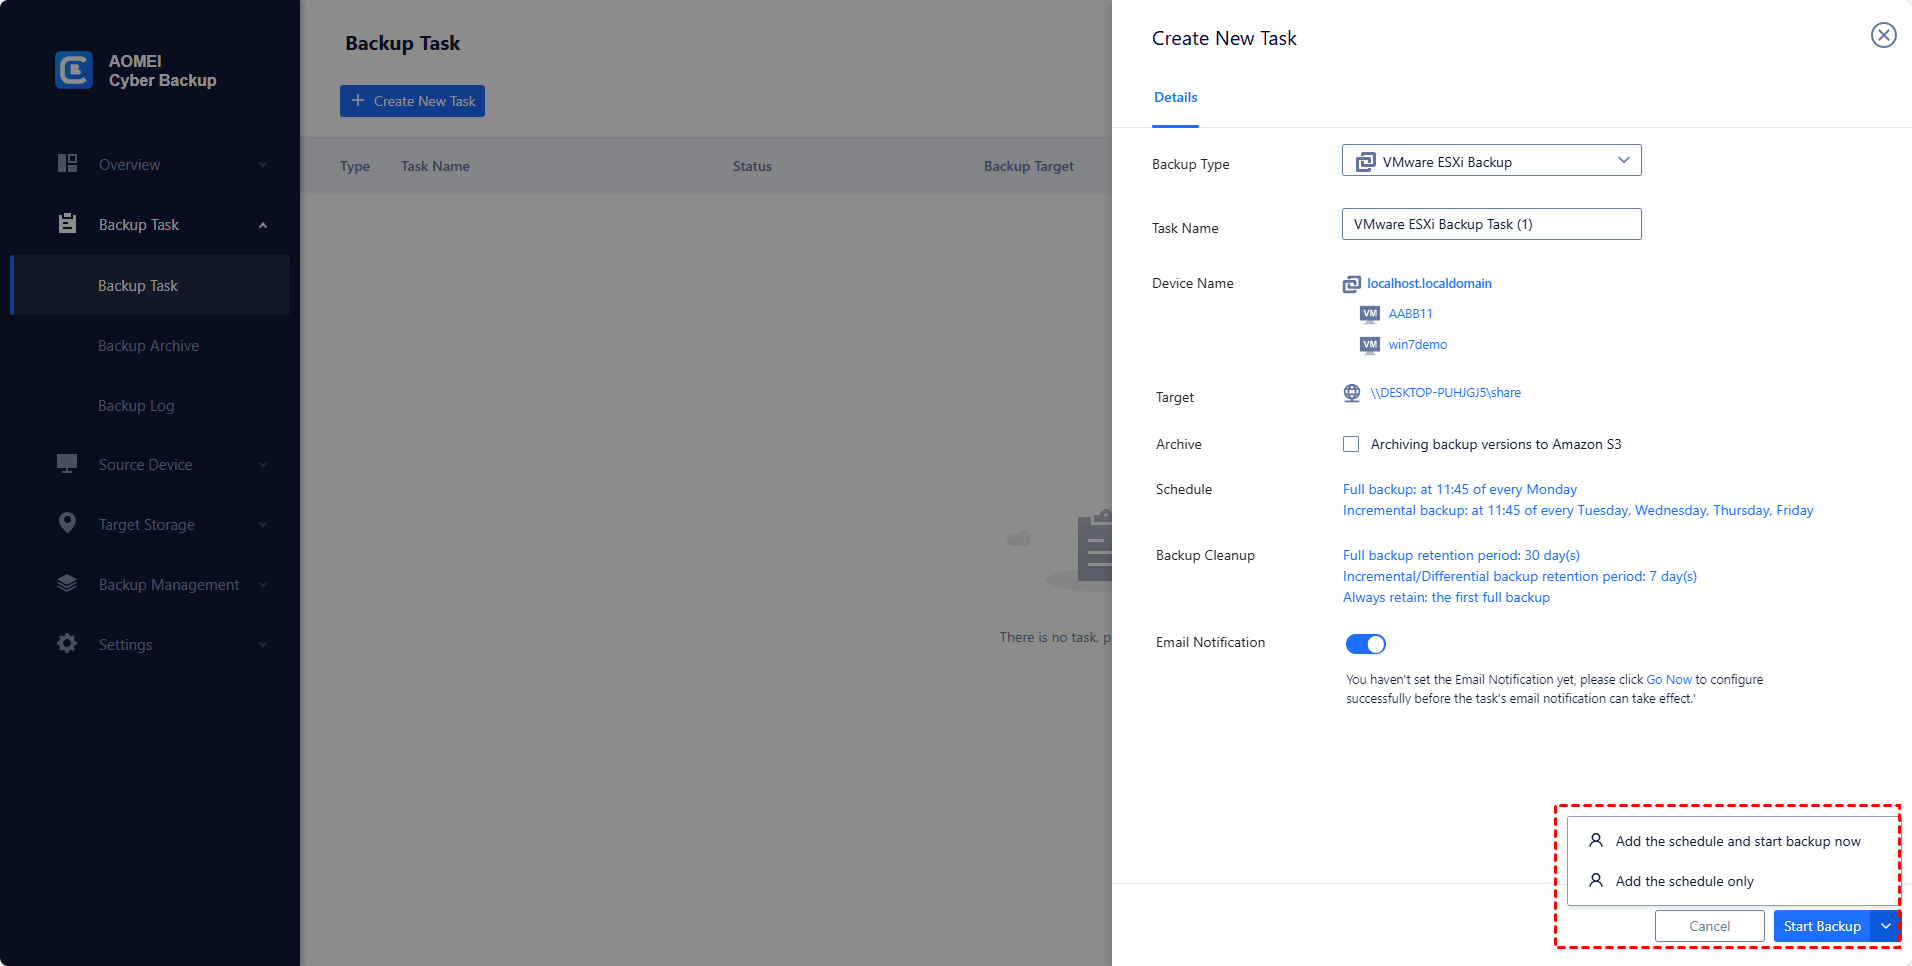
Start Backup

Created backup tasks will be listed and monitored separately, for restoring, progress checking and schedule changing.

When restoring, you can also restore to new location to create a new VM in the same or another datastore/host directly from the backup, saving the trouble of re-configuring the new VM.
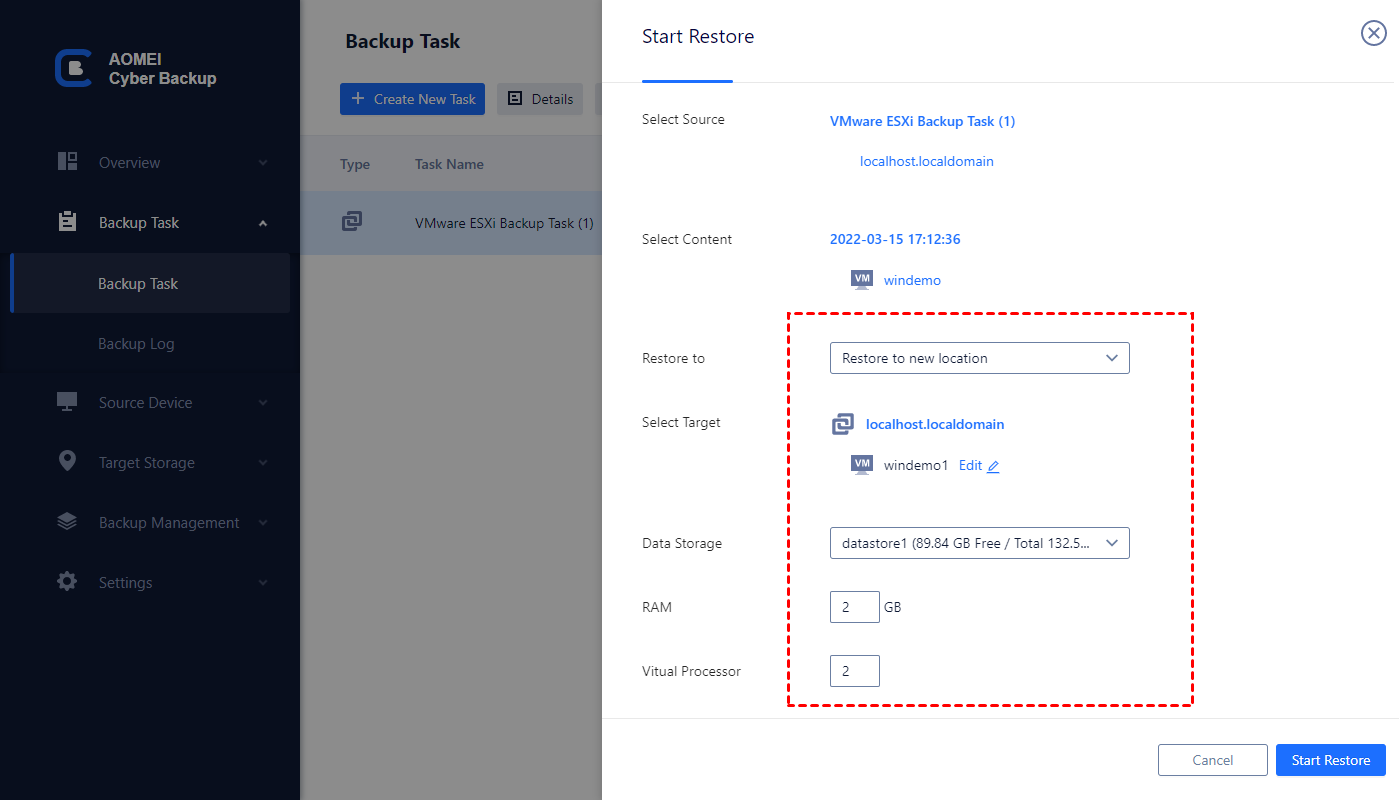
Restore to new location

Summary

To experience timely feature updates and technical support, you may want your vCenter upgrade to the newest version. Luckily, the installation and configuration of vCenter Server has been greatly simplified with vCenter Server Appliance (VCSA).

In this article, I showed you the detailed steps of how to upgrade vCenter 6.7 to 7.0 via VCSA. If you need to manage a large virtual environment, you can also to configure multiple vCenter Servers to work simultaneously.

Wednesday, 15 February 2023

upgrading from NSX-V to NSX-T


  1. Preparation | Prepare the environment for upgrade. Check for compatibility and prerequisites, take a backup of NSX-v configuration and create a rollback plan.
  2. Upgrade vCenter | Upgrade the vCenter server to the latest version that is compatible with NSX-t.
  3. Upgrade NSX Manager | Upgrade NSX Manager to the latest version.
  4. Upgrade NSX Controller | Upgrade NSX Controller cluster to the latest version.
  5. Upgrade NSX Edges | Upgrade NSX Edge nodes to the latest version.
  6. Upgrade NSX Dataplane | Upgrade the data plane components such as vDS, host preparation and VXLAN.
  7. Upgrade NSX Services | Upgrade NSX services such as firewall, load balancer and others.
  8. Validation | Validate the upgrade to ensure everything is working as expected.
  9. Cleanup | Remove the old NSX-v components.

Wednesday, 1 February 2023

Strengthen Security of Your Data Center with the NIST Cybersecurity Framework

The NIST Cybersecurity Framework (CSF) is a set of guidelines that organizations can use to improve their cybersecurity posture. Here are some steps organizations can take to strengthen security in their data center using the NIST CSF:


  1. Perform a risk assessment: Start by identifying potential threats to the data center and assessing the likelihood and impact of each threat.

  2. Implement security controls: Based on the risk assessment, implement appropriate security controls to mitigate identified risks.

  3. Establish security policies and procedures: Develop and implement security policies and procedures that align with the NIST CSF. This includes access control, incident response, and security monitoring.

  4. Train employees: Ensure that employees understand the importance of cybersecurity and are trained on best practices to reduce risk.

  5. Continuously monitor and evaluate security: Regularly review and assess the effectiveness of security controls and make changes as needed to address any vulnerabilities.

  6. Encrypt data: Encrypt sensitive data to protect it from unauthorized access.

  7. Implement network segmentation: Segment the network to limit the scope of potential damage in the event of a security breach.

  8. Apply software updates and patches: Keep software and systems up-to-date to ensure that known vulnerabilities are addressed.


By following these steps and incorporating the NIST CSF into your overall security strategy, you can strengthen the security of your data center and better protect against cyber threats.